- 所有文章/
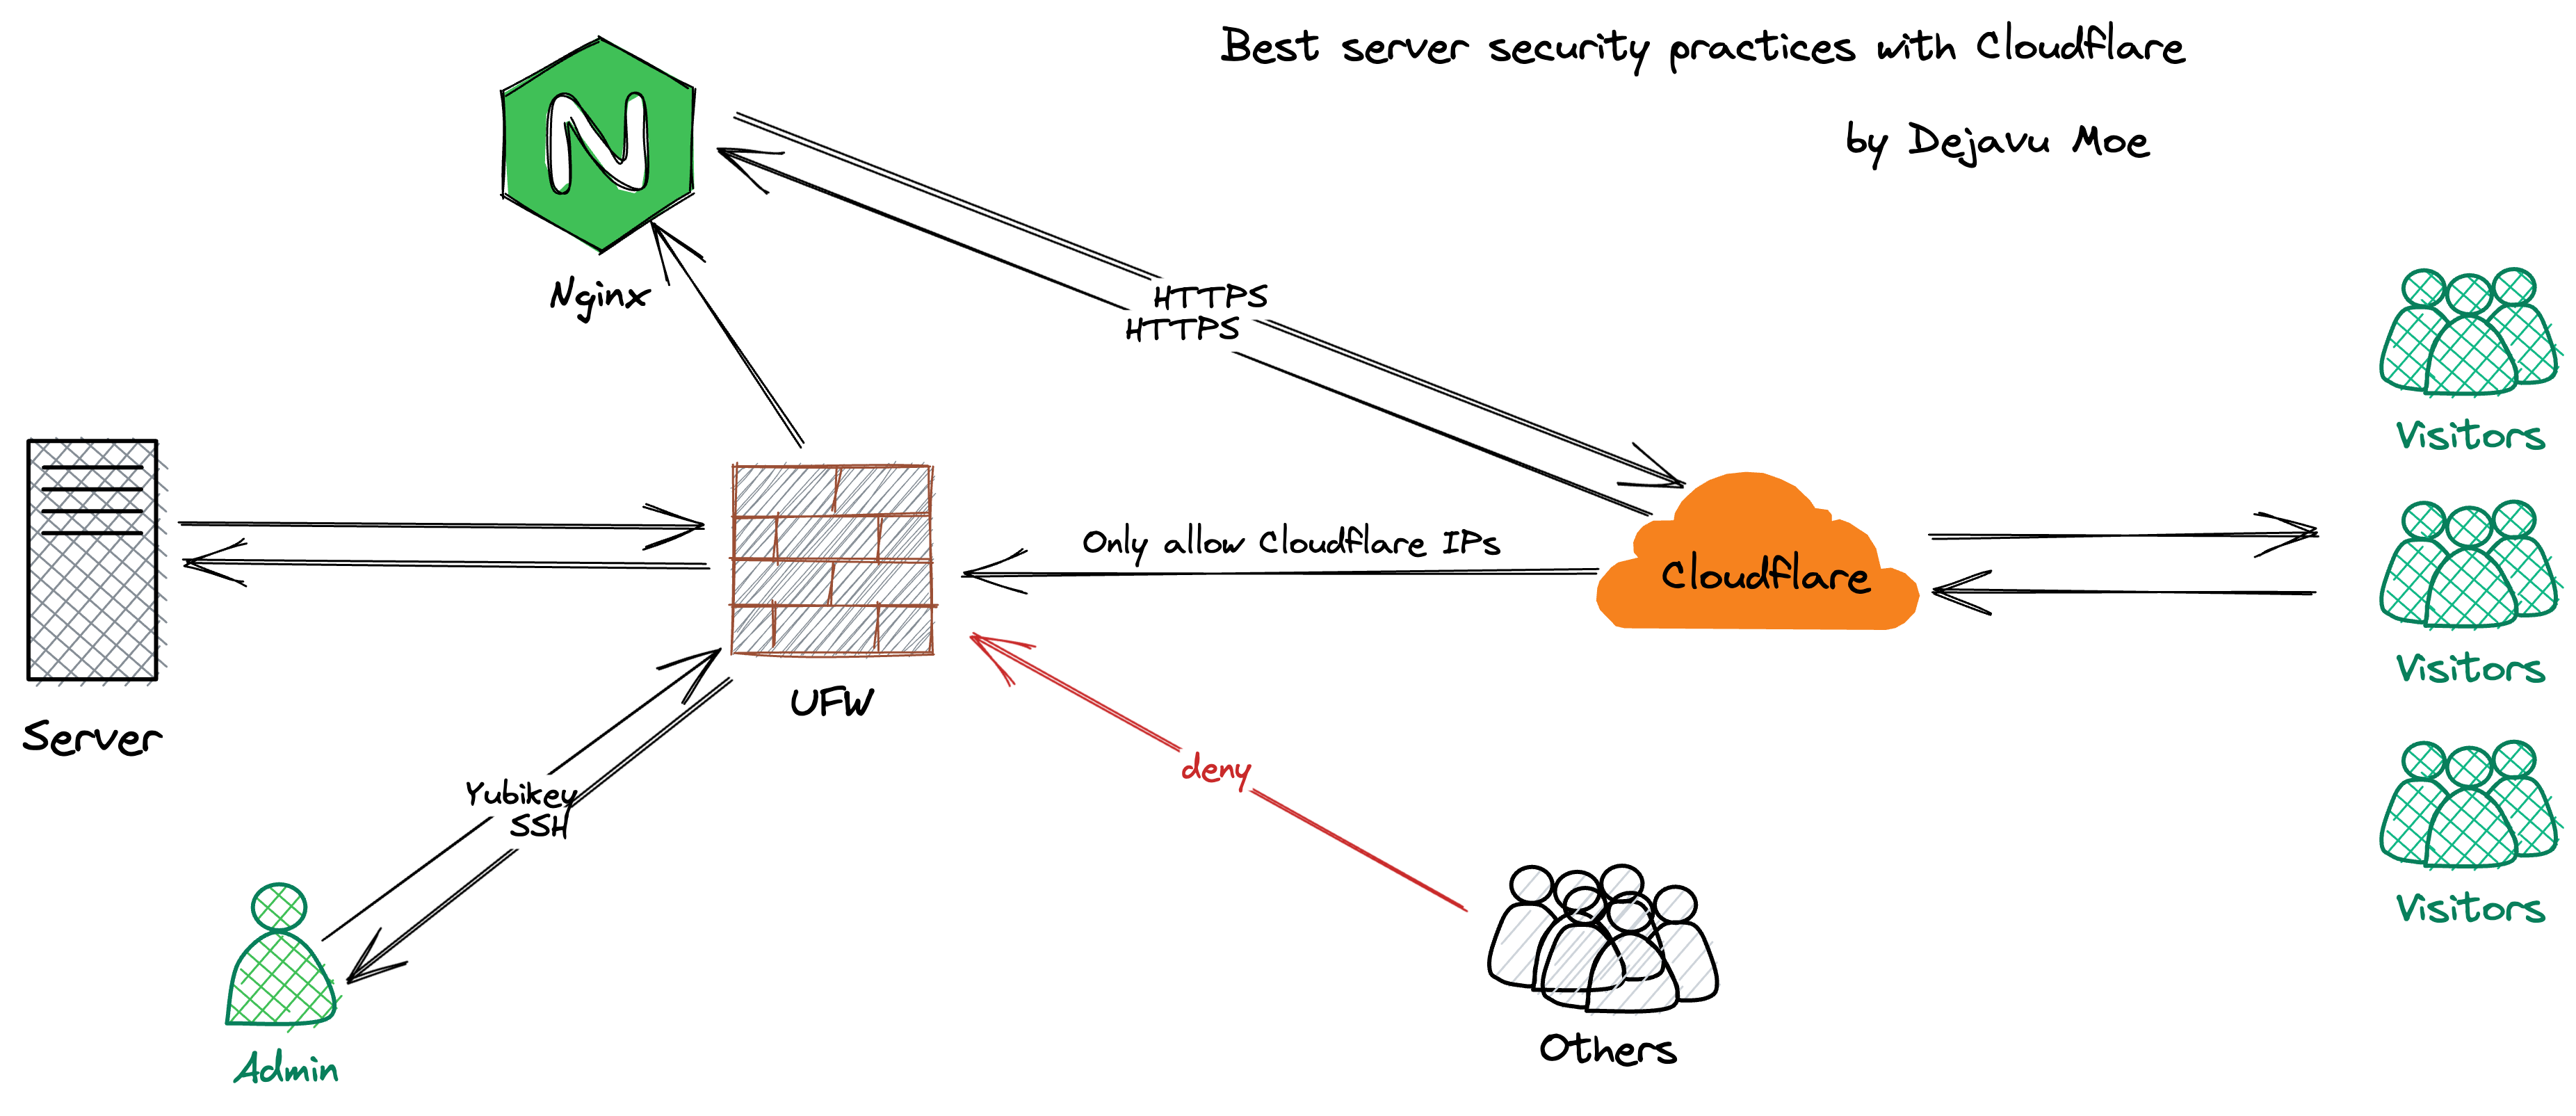
服务器使用 Cloudflare CDN 的最佳实践
本文目录
前言 #
以前感觉 Nginx 配置起来麻烦,后来用上 Cloudflare Tunnel 尝到自动反向代理和 HTTPS 的甜头后,就更不想尝试 Nginx 了,然而 Cloudflare Tunnel 并不是万能的解,对于有些服务的支持不是很好。
最近,对于一些较为庞大的服务,我尝试采用了传统的 Nginx 反向代理结合 Cloudflare CDN 的方式来访问。得益于 Cloudflare 提供的源服务器证书,部署完全的 HTTPS 变的简单,无需配置 CertBot 或 acme.sh,Cloudflare 也会自动颁发、部署和更新边缘证书。
在本文中记录下我的简单实践,这个过程也大致熟悉了 Nginx 的使用,还是挺容易的。1
SSH 安全 #
SSH 是访问我们服务器的大门,可以有两种方式来保护对它的访问:
- 关闭 SSH 端口,使用 Cloudflare Tunnel 进行 SSH 访问
- 开启 SSH 端口,进行 SSH 相关的加固
对于第 1 种方式,无疑是最安全的 2,但是 SSH 质量会受到 Cloudflare 相关服务运行状态的影响:如 Cloudflare Tunnel 服务降级、服务器上的 cloudflared 进程 panic 🥹 等等。
第 2 种方式则是常规的 SSH 加固:
更改 SSH 默认端口
禁止空密码登录
禁止 root 用户登录
使用公/私钥访问 SSH(使用硬件安全密钥更佳)3
配置 Fail2ban
配置 UFW #
一般情况下,除了 SSH 端口,我们仅开放 HTTP (80) 和 HTTPS (443),先在服务器商的云网络管理后台禁止其他端口的流量,然后配置 IP 访问策略。
UFW 是简化配置 Linux 系统底层防火墙的前端工具,它非常易于使用,在 Ubuntu 中它是默认安装的,对于 Debian 系统我们需要手动安装
sudo apt update && sudo apt install ufw -y
第一步当然是放行 SSH 端口(将 9912 改为实际 SSH 端口)
sudo ufw allow 9912/tcp
第二步,拒绝所有入站流量
sudo ufw default deny incoming
第三步,80 和 443 端口仅允许被 Cloudflare IP 访问,手动输入太麻烦,创建一个脚本
touch ufw-only-cf.sh
编辑脚本
vim ufw-only-cf.sh
写入一下内容保存
#!/bin/bash

for ipv4 in `curl -s https://www.cloudflare.com/ips-v4 | tee ips-v4`
do
    sudo ufw allow from $ipv4 to any port 80
    sudo ufw allow from $ipv4 to any port 443
done

for ipv6 in `curl -s https://www.cloudflare.com/ips-v6 | tee ips-v6`
do
    sudo ufw allow from $ipv6 to any port 80
    sudo ufw allow from $ipv6 to any port 443
done
执行脚本
sudo chmod +x ufw-only-cf.sh && ./ufw-only-cf.sh
启用 UFW
sudo ufw enable
重载 UFW 规则
sudo ufw reload
配置 Nginx #
为了让我们的服务透过 Cloudflare CDN 仍然能够获得访客的真实 IP,需要配置一下 Nginx,先备份默认配置文件
sudo cp /etc/nginx/nginx.conf /etc/nginx/nginx.conf.bak
编辑 Nginx 默认配置文件
sudo vim /etc/nginx/nginx.conf
找到下面这部分
http {
  ...
}
加入下面内容 4
# modified
# https://www.cloudflare.com/ips-v4
set_real_ip_from 173.245.48.0/20;
set_real_ip_from 103.21.244.0/22;
set_real_ip_from 103.22.200.0/22;
set_real_ip_from 103.31.4.0/22;
set_real_ip_from 141.101.64.0/18;
set_real_ip_from 108.162.192.0/18;
set_real_ip_from 190.93.240.0/20;
set_real_ip_from 188.114.96.0/20;
set_real_ip_from 197.234.240.0/22;
set_real_ip_from 198.41.128.0/17;
set_real_ip_from 162.158.0.0/15;
set_real_ip_from 104.16.0.0/13;
set_real_ip_from 104.24.0.0/14;
set_real_ip_from 172.64.0.0/13;
set_real_ip_from 131.0.72.0/22;

# https://www.cloudflare.com/ips-v6
set_real_ip_from 2400:cb00::/32;
set_real_ip_from 2606:4700::/32;
set_real_ip_from 2803:f800::/32;
set_real_ip_from 2405:b500::/32;
set_real_ip_from 2405:8100::/32;
set_real_ip_from 2a06:98c0::/29;
set_real_ip_from 2c0f:f248::/32;

# CF-Connecting-IP is recommend
# real_ip_header X-Forwarded-For;
real_ip_header CF-Connecting-IP;
检查一下 Nginx 配置
sudo nginx -t
OK 的话,重载 Nginx 配置
sudo systemctl reload nginx
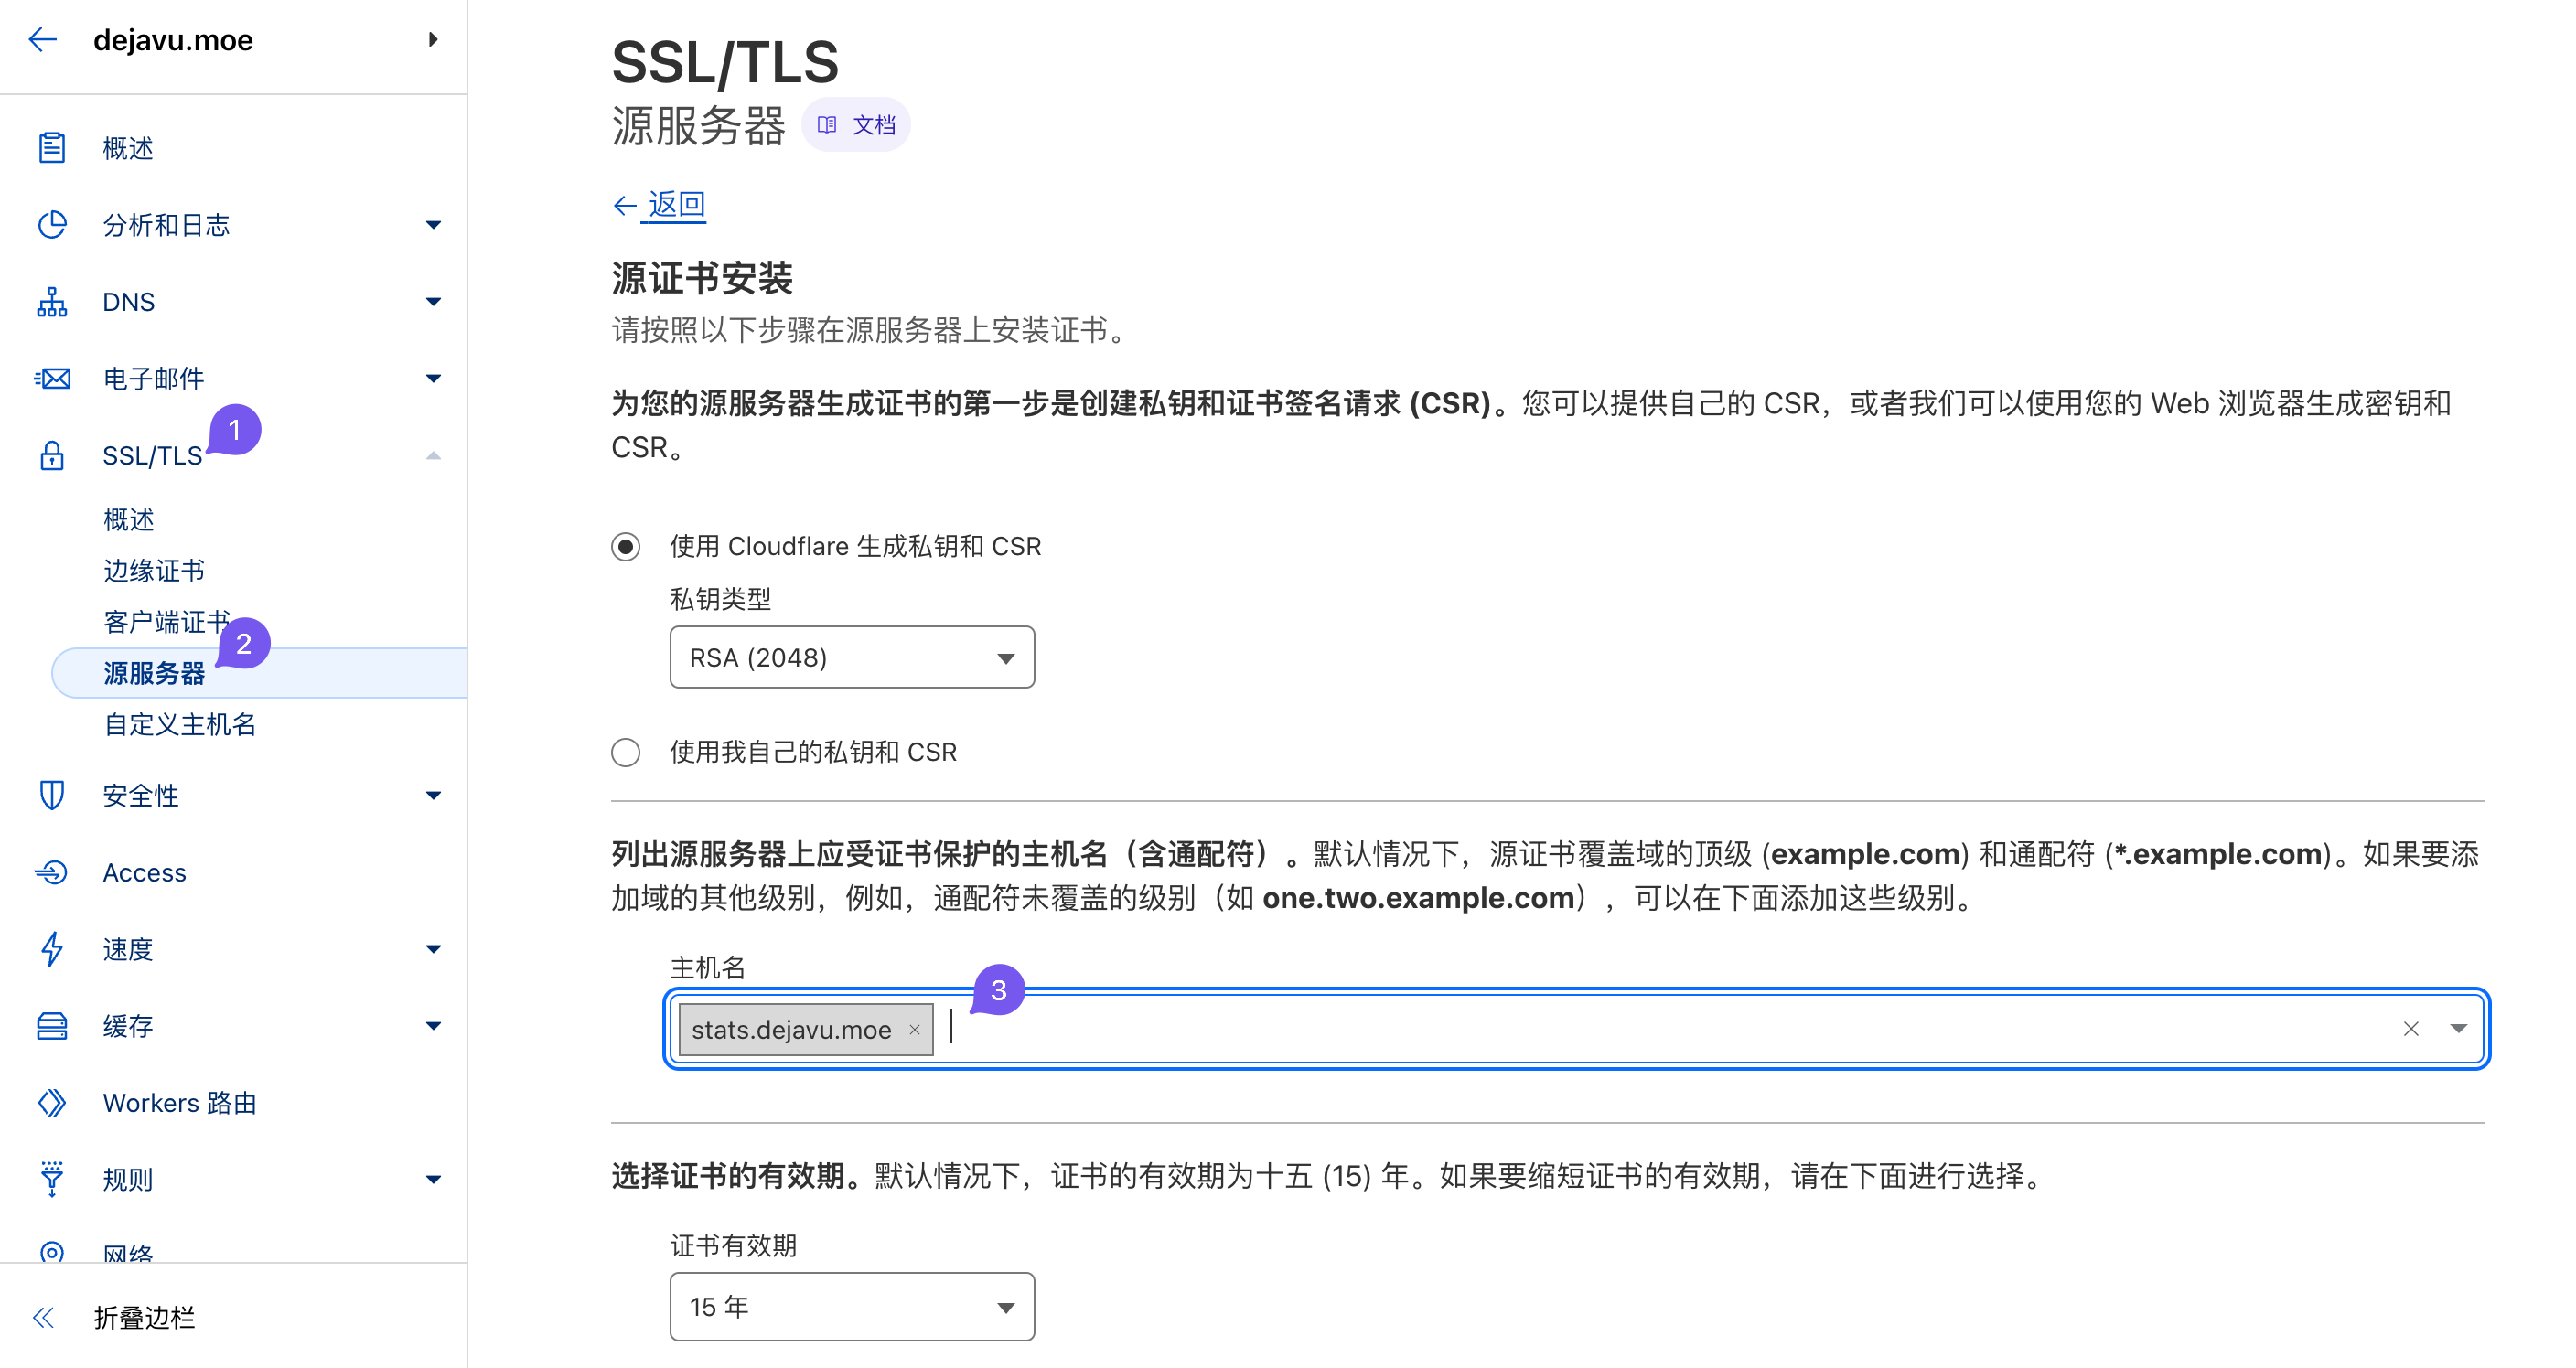
源服务器证书 #
在 Cloudflare 上生成对应的源服务器 SSL 证书,有效期最长 15 年,这个证书只被 Cloudflare 自身信任
然后将它安装到服务器上的 Web Server,以 Nginx 反代 Plausible 服务为例
cd /etc/nginx
创建一个 cert 目录,以后我们的证书都放在这里
sudo mkdir cert && cd cert
创建上面域名为 stats.dejavu.moe 的源服务器证书
sudo touch stats.dejavu.moe.pem
sudo touch stats.dejavu.moe.key
分别编辑公钥和私钥文件,将源服务器证书写进去保存
sudo vim stats.dejavu.moe.pem
sudo vim stats.dejavu.moe.key
创建 Nginx 配置文件
sudo vim /etc/nginx/conf.d/stats.dejavu.moe.conf
安装源服务器证书示例
server {
    listen 80;
    listen [::]:80;
    server_name stats.dejavu.moe;

    return 301 https://$host$request_uri;
}

server {
    listen 443 ssl http2;
    listen [::]:443 ssl http2;
    server_name stats.dejavu.moe;

    # 指定源服务器证书路径
    ssl_certificate /etc/nginx/cert/stats.dejavu.moe.pem;
    ssl_certificate_key /etc/nginx/cert/stats.dejavu.moe.key;

    location / {
        proxy_pass http://127.0.0.1:8000;
        proxy_set_header Host $host;
        proxy_set_header X-Real-IP $remote_addr;
        proxy_set_header X-Forwarded-Proto https;
        proxy_set_header X-Forwarded-For $proxy_add_x_forwarded_for;
        proxy_redirect off;
    }
}
检查配置文件,没问题就可以重载 Nginx 配置了
sudo nginx -t
sudo systemctl reload nginx
然后在 Cloudflare 控制台将域名解析到服务器 IP,设置 SSL/TLS 加密模式 为 完全(严格) 即可。
参考信息
不尝试永远不知道 🤤 ↩︎
完全信任 Cloudflare 的话 ↩︎
比如 Yubikey, Canokey, FeiTian Key… ↩︎
Cloudflare IP 范围很少变动,截止本文时间,上一次变动是 2021 年 4 月 8 日 ↩︎