- 所有文章/
我是如何建立自己的个人博客的?
本文目录
前言 #
2023 年的今天,我们是否仍然有建立个人博客网站的必要?每个人应该有不同的答案,于我而言,答案是肯定的。
本文介绍我是如何建立自己的个人博客的,您可以在 DejavuMoe/hugo-start 查看示例站点源码,演示地址: https://hugo-start.pages.dev/
选择 #
如何选择博客程序?静态博客程序和动态博客程序的主要区别在于它们生成网页的方式不同。
一般情况下,动态博客程序通过服务端进行数据库查询,动态地渲染网页返回给用户(浏览器);静态博客程序则在每次构建过程中直接生成纯静态网页供用户(浏览器)访问。
因此,为了构建一个简洁快速、稳定安全、维护成本极低的个人博客,静态博客程序是一个不二选择。
在静态博客程序中可供选择的非常多,Hugo 是我最终的选择:使用 Markdown 写作、社区非常活跃、构建静态网站的速度非常快!
![]()
准备 #
- 一台联网的计算机
- 安装 Git
- 安装 Hugo
- 注册一个域名 [可选的]
本文假设您已经了解 Markdown 的标记语法 1、Git 的基础命令,此外的任何代码基础和知识都不是必需的。
费用 #
我们将使用 GitHub 来托管源码,使用 Cloudlfare Pages 来部署 Hugo,除了注册自己的域名,其他都是完全免费的!
开始 #
初始化 #
在 Windows、macOS、Linux、BSD 等操作系统上 安装 Hugo 的细节本文不作讨论 2 ,安装完成后,找一个目录来进行博客站点的初始化(hugo-start 是初始化站点文件夹的名称)
hugo new site hugo-start -f yml

# 进入 Hugo 站点文件夹
cd hugo-start

# 初始化 Git 仓库
git init
安装主题 #
推荐 PaperMod 主题,它基于小北哥的 Paper 魔改,在简洁快速的基础上,功能也非常丰富。由于 Hugo 站点已经存在一个 Git 仓库,因此主题使用 Git 子模块安装
git submodule add https://github.com/adityatelange/hugo-PaperMod.git themes/PaperMod
现在 Hugo 站点文件目录如下
.
├── .git	# Git仓库信息
├── .gitmodules	# Git 子模块配置
├── archetypes	# 原型模板
│   └── default.md
├── assets
├── config.yml	# Hugo 和 PaperMod 主题的配置文件
├── content	# 页面和文章放在这里
├── data
├── layouts	# 页面布局
├── public	# 构建静态网站的输出目录
├── static	# 静态文件目录(构建时会自动复制到 /public)
└── themes	# 主题目录
    └── PaperMod	# PaperMod 主题
应用主题 #
编辑 config.yml 文件,它合并了 Hugo 和 PaperMod 主题的配置文件,下面是我的推荐配置文件 3
# 起始 URL(换成您自己的域名)
baseURL: 'https://hugo-start.pages.dev'
# 网站标题
title: 'Hugo Start'
# 每页显示的文章数量
paginate: 5
# 主题名称
theme: PaperMod
# 语言代码(zh-简体中文)
languageCode: 'zh'
DefaultContentLanguage: 'zh'
# 是否有 CJK 语言(中-日-韩)
hasCJKLanguage: true

# 是否生成 robots.txt
enableRobotsTXT: true

# 是否构建草稿
buildDrafts: false
# 是否构建未来的文章
buildFuture: false
# 是否构建过期的文章
buildExpired: false
# 是否启用 Emoji
enableEmoji: true
# 是否启用 Git 信息
enableGitInfo: false

# Google Analytics ID
googleAnalytics: ''

# 压缩输出静态文件
minify:
  # 是否不压缩 XML 文件
  disableXML: true
  minifyOutput: true

# 全局配置
params:
  env: production
  # 网站标题
  title: 'Hugo Start'
  # 网站描述
  description: 'Hugo Start with PaperMod'
  # 网站关键词(大部分搜索引擎已放弃,可注释掉)
  # keywords: [Blog, Portfolio, PaperMod]

  # 网站作者
  author: 'Your Name'
  # 多个作者写法
  # author: ["Me", "You"]

  # OpenGraph / Twitter Card 预览图片(/static 下面的文件名称)
  images: ['opengraph.webp']
  # 日期格式
  DateFormat: '2006-01-02'
  # 默认主题
  defaultTheme: auto # dark, light
  # 是否启用主题切换按钮
  disableThemeToggle: false
  # 是否启用阅读时间展示
  ShowReadingTime: true
  # 是都启用分享按钮
  ShowShareButtons: true
  ShowPostNavLinks: true
  # 是否启用面包屑导航
  ShowBreadCrumbs: true
  # 是否显示代码复制按钮
  ShowCodeCopyButtons: false
  # 是否显示字数统计
  ShowWordCount: true
  # 是否在页面显示 RSS 按钮
  ShowRssButtonInSectionTermList: true
  UseHugoToc: true
  disableSpecial1stPost: false
  # 是否禁用首页滚动到顶部
  disableScrollToTop: false
  # 是否启用评论系统
  comments: false
  # 是否隐藏 Meta 信息
  hidemeta: false
  # 是否隐藏文章摘要
  hideSummary: false
  # 是否显示目录
  showtoc: false
  # 是否默认展开文章目录
  tocopen: false

  assets:
    # disableHLJS: true # to disable highlight.js
    # disableFingerprinting: true

    # 网站 Favicon 图标相关信息
    # 可在 https://realfavicongenerator.net/ 生成
    # 将图片复制到 /static 目录下
    # 然后修改下面代码中的文件名
    favicon: '<link / abs url>'
    favicon16x16: '<link / abs url>'
    favicon32x32: '<link / abs url>'
    apple_touch_icon: '<link / abs url>'
    safari_pinned_tab: '<link / abs url>'

  label:
    # 使用文本替代 Logo 标签
    text: 'Hugo Start'
    # 网站 Logo 图片(/static 下面的文件名称)
    icon: /apple-touch-icon.png
    # 图标高度
    iconHeight: 35

  # 主页展示模式
  # 个人信息模式
  profileMode:
    enabled: false # needs to be explicitly set
    title: ExampleSite
    subtitle: 'This is subtitle'
    imageUrl: '<img location>'
    imageWidth: 120
    imageHeight: 120
    imageTitle: my image
    buttons:
      - name: Posts
        url: posts
      - name: Tags
        url: tags

  # 主页 - 信息模式(默认)
  homeInfoParams:
    Title: "Hi there \U0001F44B"
    Content: Welcome to hugo start, this is a example of Hugo and PaperMod

  #  主页 - 信息模式 图标展示
  socialIcons:
    # - name: twitter
    #   url: "https://twitter.com/"
    # - name: stackoverflow
    #   url: "https://stackoverflow.com"
    - name: github
      url: 'https://github.com/DejavuMoe/hugo-start'
    - name: mastodon
      url: 'https://sink.love/@dejavu'

  # 站长验证
  analytics:
    google:
      SiteVerificationTag: ''
    bing:
      SiteVerificationTag: ''
    yandex:
      SiteVerificationTag: ''

  # 文章封面设置
  cover:
    hidden: true # hide everywhere but not in structured data
    hiddenInList: true # hide on list pages and home
    hiddenInSingle: true # hide on single page

  # 关联编辑
  editPost:
    URL: 'https://github.com/DejavuMoe/hugo-start/edit/master/content/posts'
    Text: 'Edit on GitHub' # edit text
    appendFilePath: true # to append file path to Edit link

  # for search
  # https://fusejs.io/api/options.html
  fuseOpts:
    isCaseSensitive: false
    shouldSort: true
    location: 0
    distance: 1000
    threshold: 0.4
    minMatchCharLength: 0
    keys: ['title', 'permalink', 'summary', 'content']

# 顶部导航栏
menu:
  main:
    - identifier: '首页'
      name: '首页'
      url: /
      weight: 1
    - identifier: '分类'
      name: '分类'
      url: /categories/
      weight: 10
    - identifier: '标签'
      name: '标签'
      url: /tags/
      weight: 20
    - identifier: '仓库'
      name: '仓库'
      url: https://github.com/DejavuMoe/hugo-start
      weight: 30
# Read: https://github.com/adityatelange/hugo-PaperMod/wiki/FAQs#using-hugos-syntax-highlighter-chroma
pygmentsUseClasses: true
markup:
  highlight:
    noClasses: false
    # anchorLineNos: true
    # codeFences: true
    # guessSyntax: true
    # lineNos: true
    # style: monokai

privacy:
  vimeo:
    disabled: true
    enableDNT: true
    simple: true

  twitter:
    disabled: true
    enableDNT: true # 是否启用添加“请勿跟踪” HTTP 头。
    simple: true # 如果启用简单模式,将建立一个静态的、无 JS 版本的推文。

  instagram:
    disabled: true
    simple: true

  youtube:
    disabled: true
    privacyEnhanced: true

services:
  instagram:
    disableInlineCSS: true # 禁用 Hugo 提供的内联样式
  twitter:
    disableInlineCSS: true # 禁用 Hugo 提供的内联样式
默认模板 #
在 archetypes 目录下新建一个 posts.md,这是我们文章的 Front Matter 字段的模板,写入内容如下
---
title: "{{ replace .Name "-" " " | title }}"
description: ""
date: {{ .Date }}
lastmod: {{ .Date }}
categories:
tags:
draft: false
---
写作 #
新文章 #
现在可以开始写文章,新建一篇文章,比如:
hugo new posts/hello-hugo-start/index.md
建议使用 Hugo 的 Page Bundle 模式来管理静态资源,此时我们的第一篇示例文章目录结构如下
.
├── .git
├── .gitmodules
├── .hugo_build.lock
├── archetypes
│   ├── default.md
│   └── posts.md
├── assets
├── config.yml
├── content	# 页面或文章
│   └── posts	# 文章目录
│       └── hello-hugo-start	# 单篇文章文件夹 Page Bunlde 模式
│           ├── cover.webp	# 文章封面图片
│           ├── index.md	# 文章 Markdown 文件
│           └── hello.webp	# 其他文章图片
├── data
├── layouts
├── public
├── resources
├── static
│   └── opengraph.webp
└── themes
    └── PaperMod
新页面 #
创建一个新的页面,比如归档页面
hugo new archives/_index.md
现在的目录结构如下
.
├── LICENSE
├── README.md
├── archetypes
│   ├── default.md
│   └── posts.md
├── assets
├── config.yml
├── content
│   ├── archives	<--- 新建的「归档」页面
│   │   └── _index.md
│   └── posts
│       └── hello-hugo-start
├── data
├── layouts
├── public
├── resources
├── static
│   └── opengraph.webp
└── themes
本地预览 #
写作的时候,启动 Hugo 的本地预览服务器可以实时预览页面更新
hugo sever

# 带上 -D 参数可以预览草稿
hugo server -D
部署 #
使用 Cloudflare Pages 和 GitHub 的集成部署,每次我们推送源码到 GitHub 后,Cloudflare 都会自动帮我们构建 Hugo 博客站点
源码管理 #
在 GitHub 创建一个新的仓库,并将本地 Hugo 站点源码推送到上面,比如:
git add .
git commit -m 'initial blog'

git remote add origin git@github.com:DejavuMoe/hugo-start.git
git push -u origin master
集成部署 #
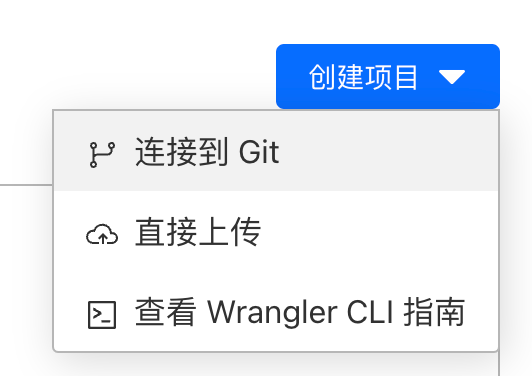
打开 Cloudflare Pages 控制台,创建项目,选择「连接到 Git」
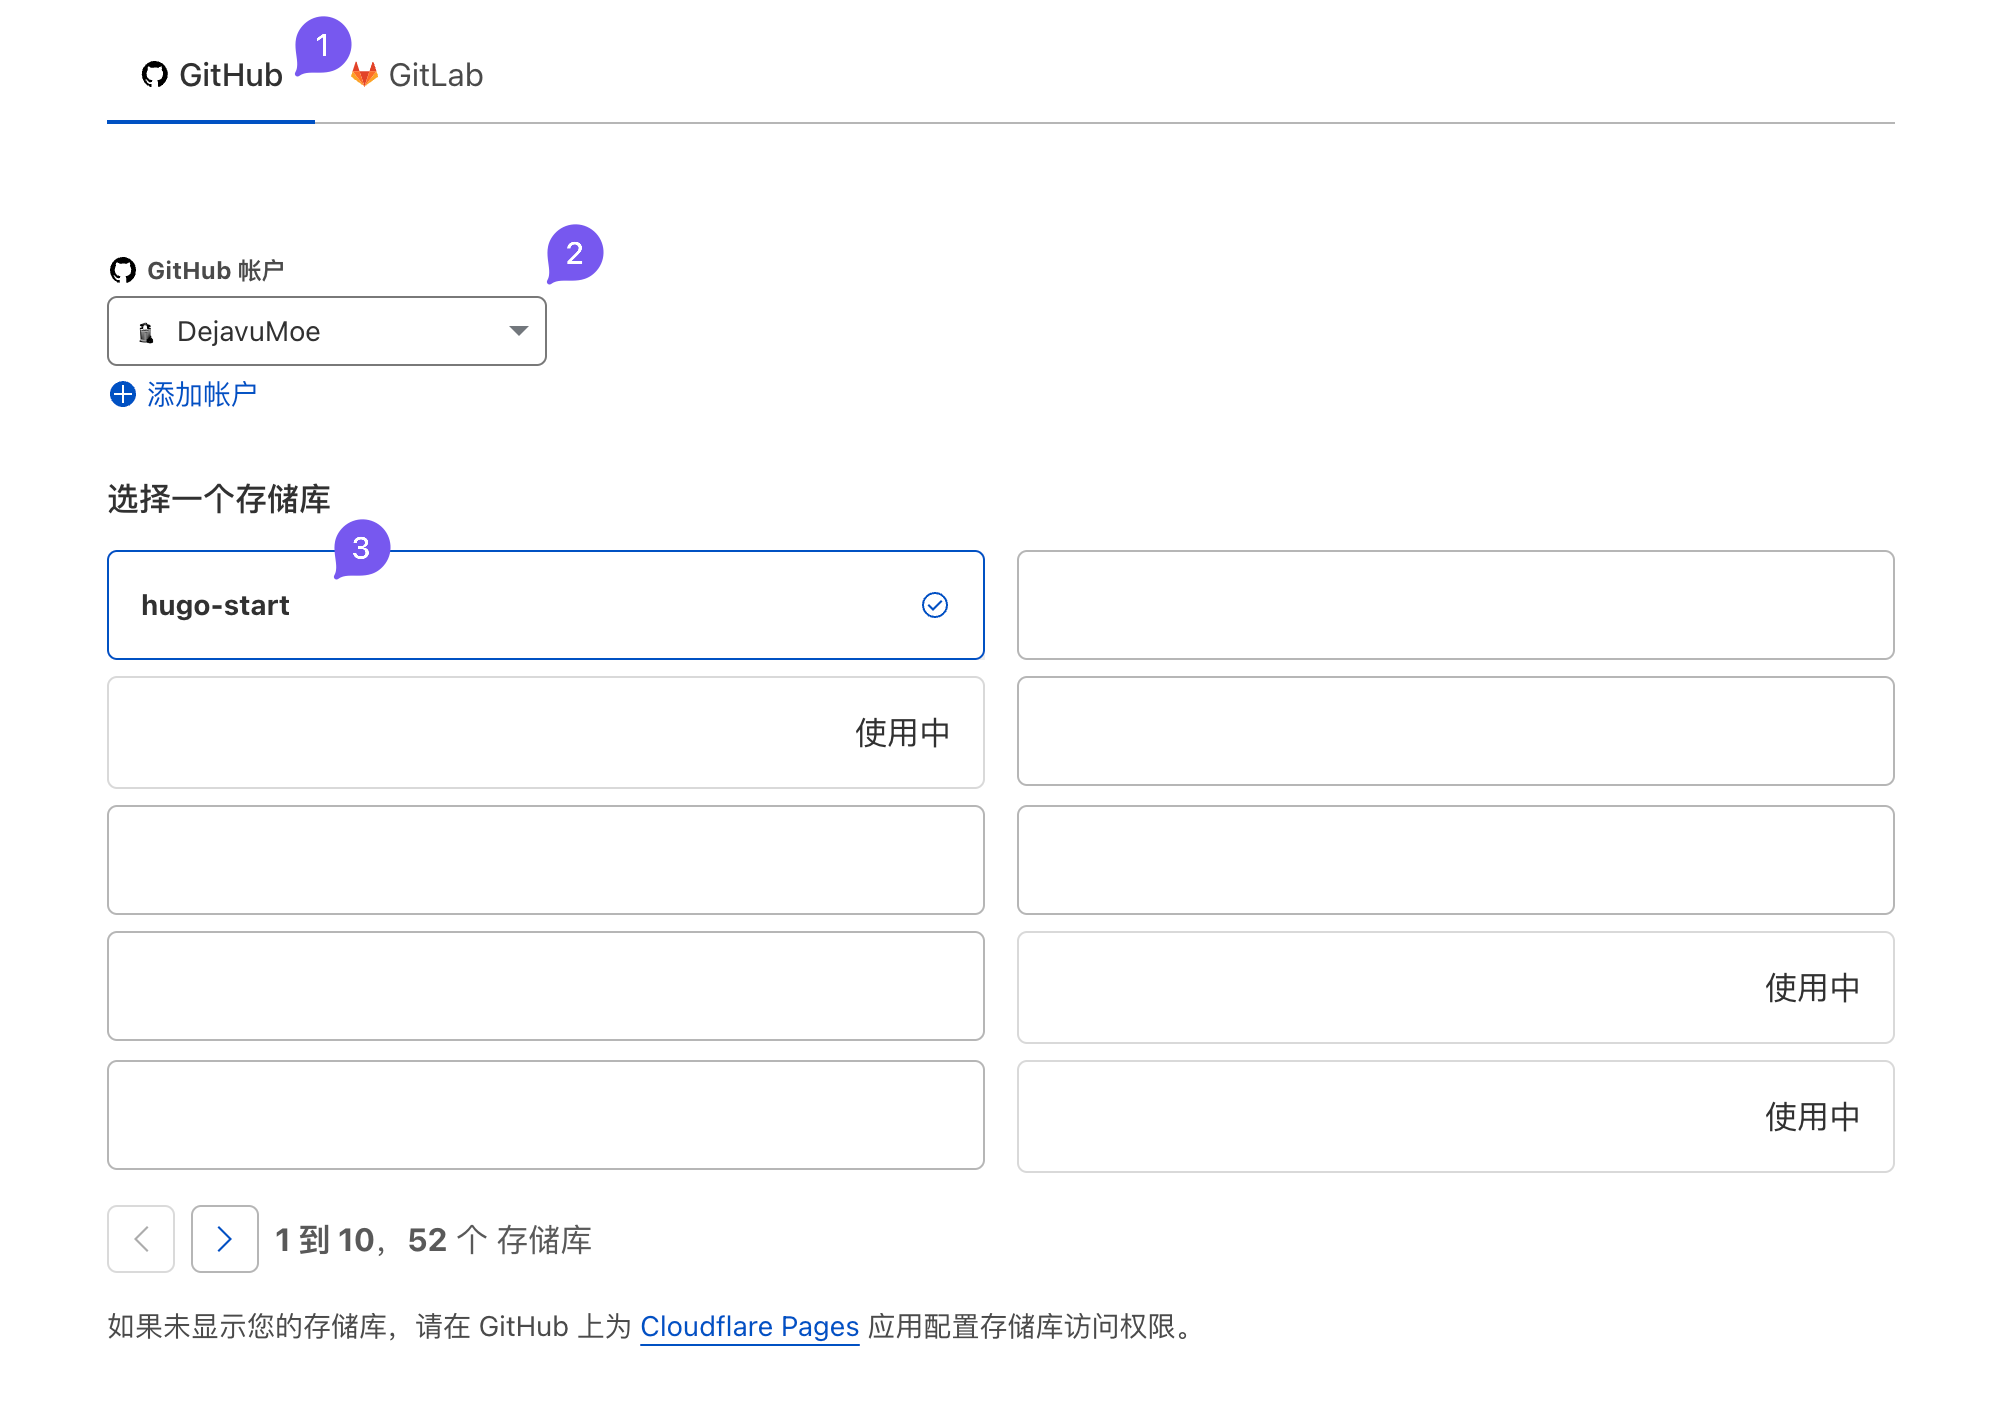
使用 GitHub 帐号登录并完成授权后,选择刚才的存储库,点击「开始设置」
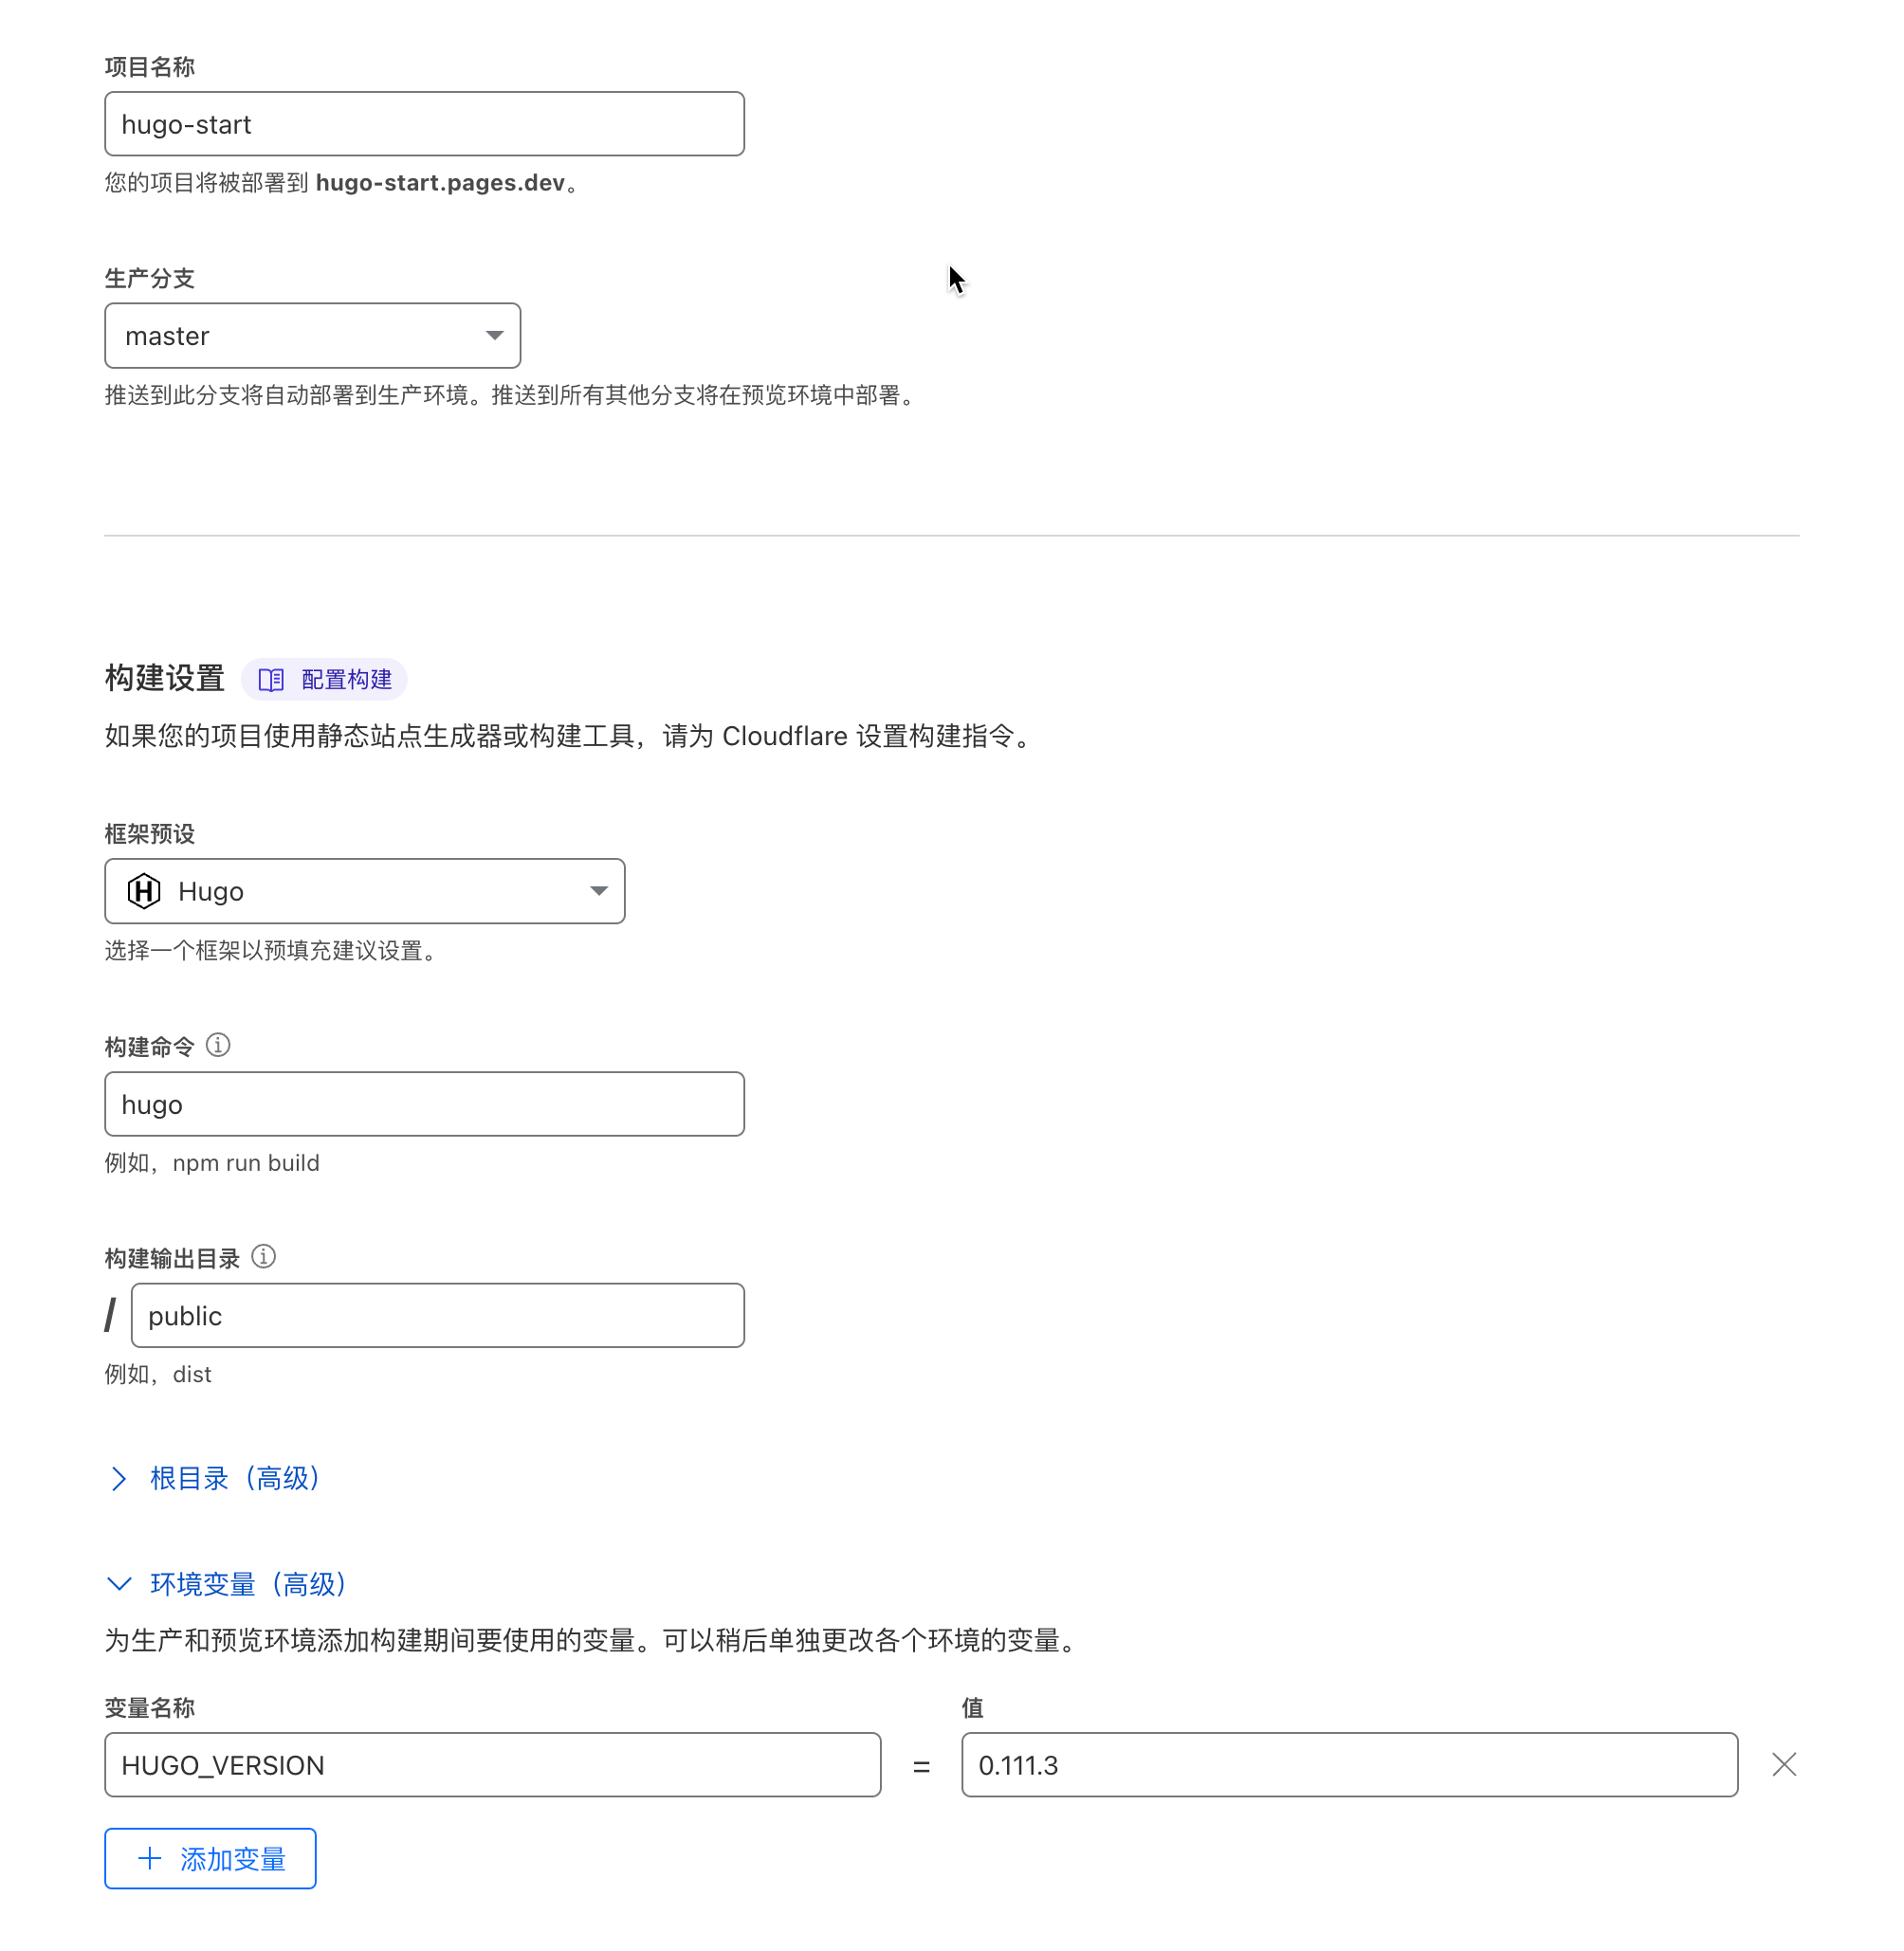
接下来的框架选择 Hugo,可以使用环境变量指定 Hugo 版本
| 环境变量 | 值 |
|---|---|
HUGO_VERSION | 0.111.3 |
默认 Cloudflare Pages 会分配一条免费子域名 4
点击「开始部署」,稍等片刻,我们的网站就构建完成了
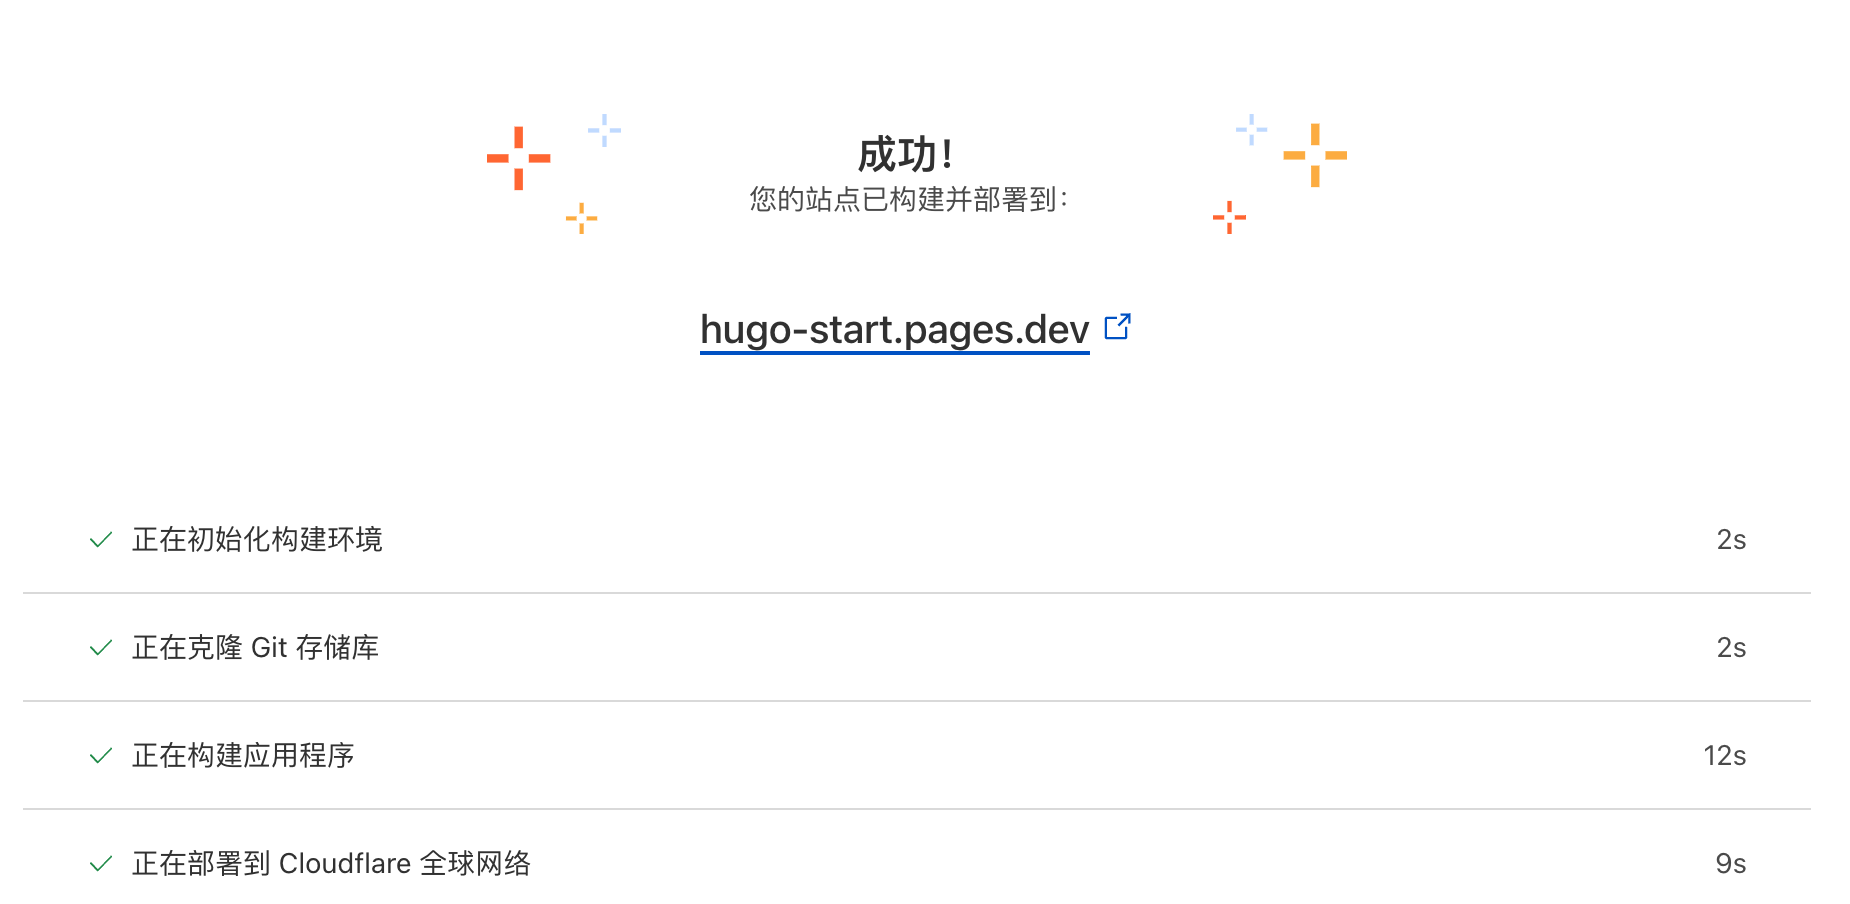
打开 https://hugo-start.pages.dev 就可以访问了,不删除项目的话,这个子域名一直可以被您使用。
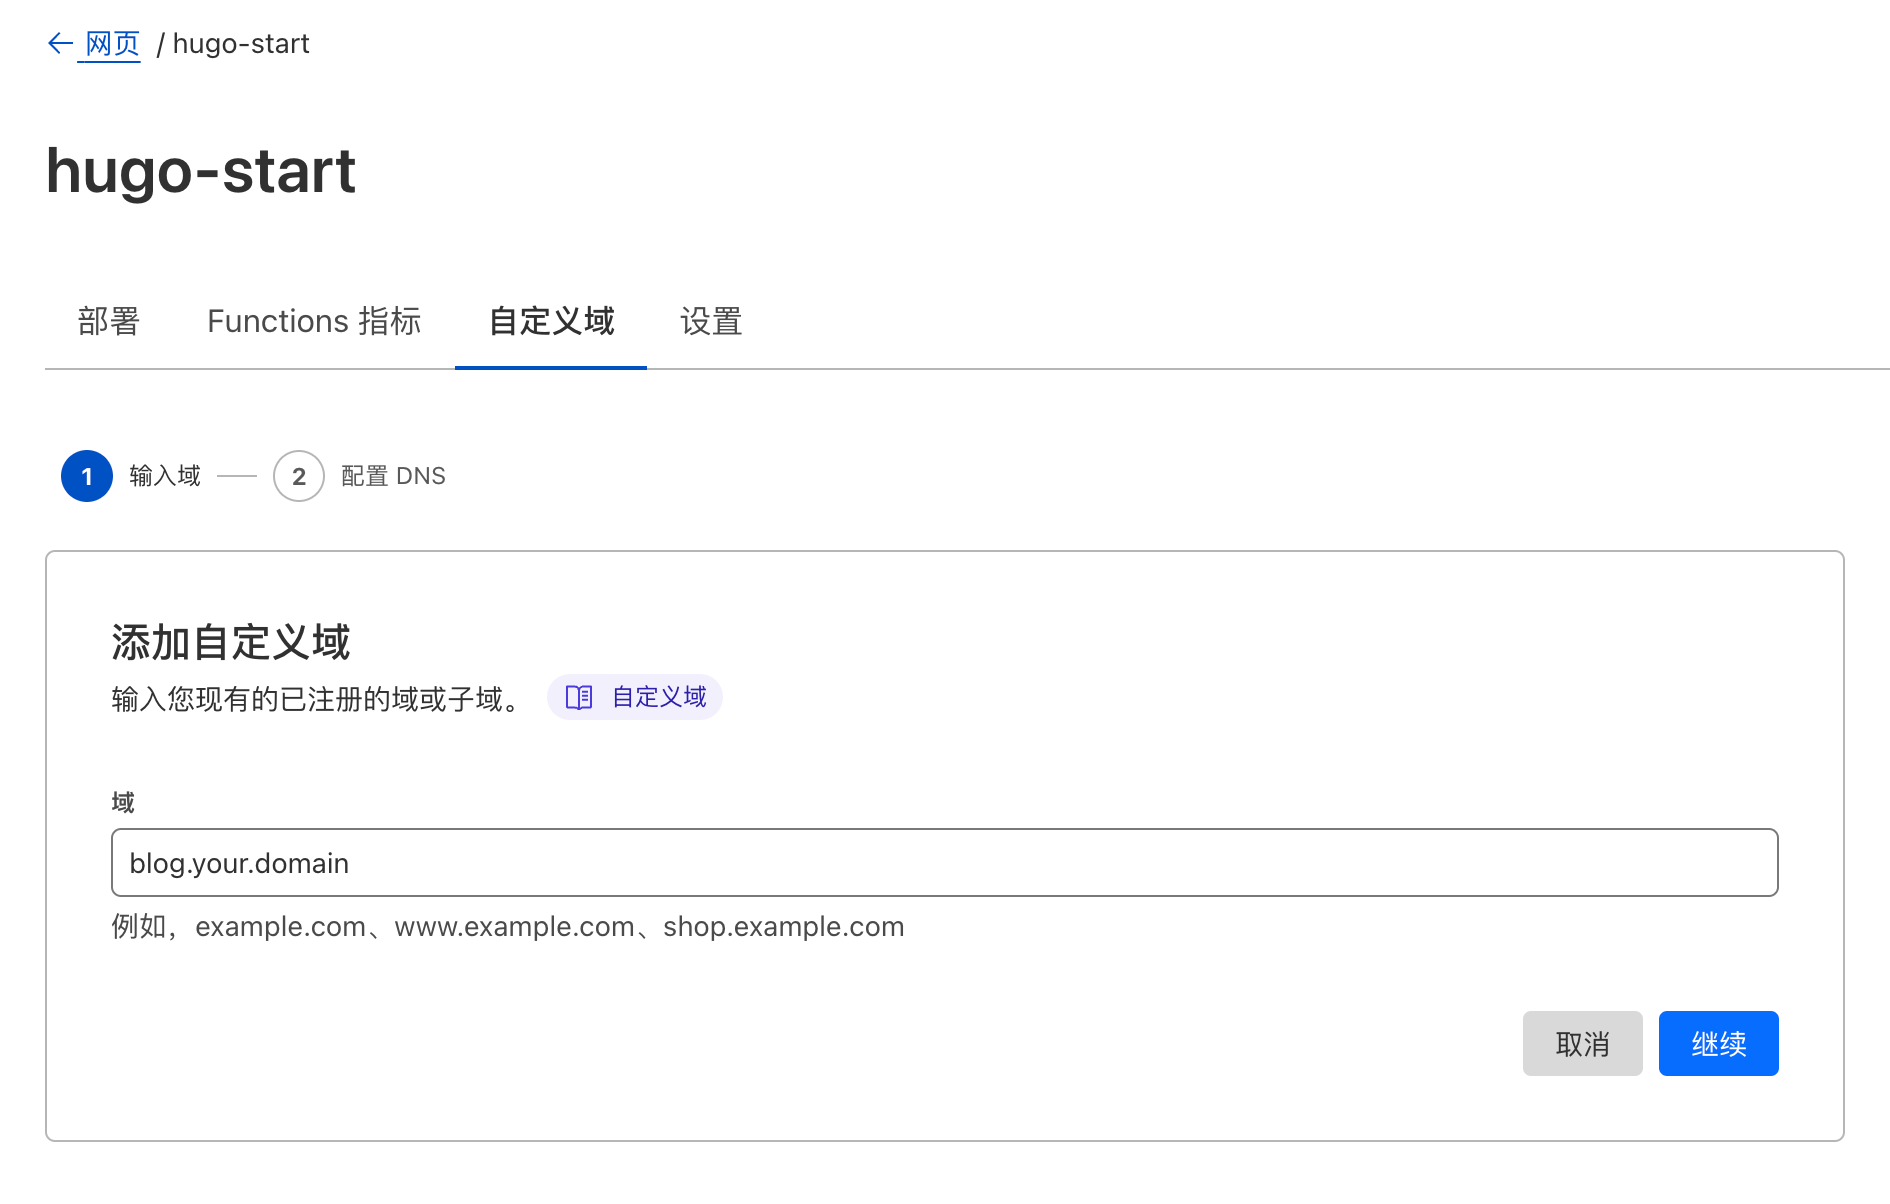
自定义域名 #
可以添加自己的域名,如果域名在 Cloudflare 上面,Cloudflare 还会自动配置 DNS 解析记录
维护 #
恢复环境 #
如果我们更换电脑后,想要恢复写作环境,可以按照下列步骤操作
- 安装 Hugo
- 配置 Git
- 克隆您自己的 Blog 仓库源码
# 克隆仓库(示例)
git clone https://github.com/DejavuMoe/hugo-start.git Blog
# 克隆 Git 子模块
cd Blog && git submodule update --init --recursive
# 启动 Hugo 预览服务器
hugo server -D
# 更新主题
git submodule update --remote --merge
魔改 Hugo 源码 #
Hugo 可以无损修改源码而不影响主题的更新,将主题对应的需要修改的源码复制到 Hugo 站点根目录下的相同目录结构,比如:
.
├── config.yml
├── content
├── layouts
│   └── partials
│        ├── extend_footer.html <--- 复制到这里
│        └── extend_head.html   <--- 复制到这里
├── theme/hugo-PaperMod/
└── layouts
    ├── partials
    │   ├── extend_footer.html <--- 想要修改的页脚
    │   └── extend_head.html   <--- 想要修改的页头
    └── robots.txt
更多详情可查看 PaperMod 主题的 FAQ 部分
添加评论系统 #
PaperMod 添加评论系统非常简单,将想要添加的评论系统的脚本文件添加到 comments.html 文件里
.
├── config.yml
├── content
├── layouts
│   └── partials
│        └── comments.html  <--- 评论系统
├── theme/hugo-PaperMod/
└── layouts
然后在 config.yml 里启用评论系统即可,完成,现在开始享受写作吧!